


Bike Maintenance Workshop: How to Fix a Flat


Don’t be afraid to ask your more bike-inclined colleagues/friends to show you how to fix a flat. Also don’t be afraid to get your hands dirty (because you will).
This post originally appeared on Arlington Transportation Partners’ blog.
One of the nice parts about working in an office with others who active commute is the brain trust that naturally forms around simple, yet intimidating topics, like how to change a flat bike tire. The conversation first started among a few of us in the office, saying how we felt silly that even though we promote biking and bike to work most days – we don’t actually know how to change a flat. Well, careful what you wish for. Just a few short weeks after this conversation took place, we were all down in the garage huddled around our bikes learning how to change a flat.
There are a lot of great resources out there that have already outlined the best ways to fix a flat, so instead of reinventing the wheel, we’ve included two pieces from The Bike House that we actually used during our bike maintenance workshop. First up, step by step instructions on how to fix a flat with bonus pictures of instructor Grace Oran and student Maggie Awad of ATP getting down and dirty.
Fix a Flat
To fix a flat, you need some basic tools: a patch kit, tire levers, and a pump (and a crescent wrench if you don’t have quick-release wheels).
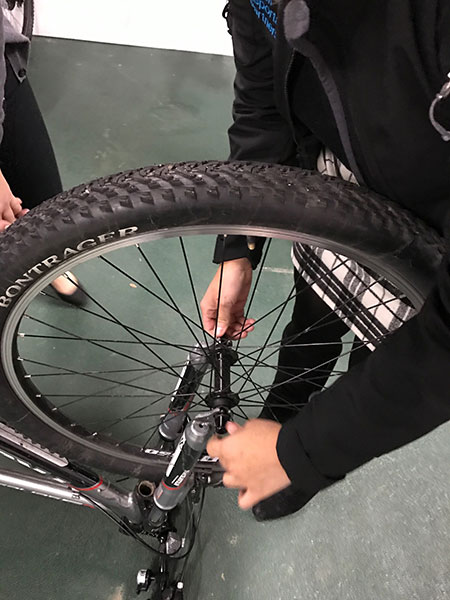
Remove your wheel.
The easiest way to work on your bike is by flipping it over and setting the bike on the seat and handlebars. Loosen the axle bolts or quick release lever until the wheel is free. To get the wheel off easily, you often need to disconnect your brakes or undo a quick-release lever on your brakes.
Pry.
Empty any remaining air by pressing on the air valve. You need to get one side of the tire bead out by prying it open with plastic tire levers (not metal, so you don’t further damage the tube). It usually helps to get two in side-by-side, then slide one around to get the tire halfway off, but sometimes three are necessary. With half of the tire still on the wheel, you can pull the tube out; be careful of the valve area.
Be a detective (with both tube and tire).
You need to find the hole (or holes) to determine what caused your flat. Pump some air into the tube and slowly look over the tube, listening for the hiss of air or trying to feel where the air is blowing out with your cheek. You also need to (carefully) feel the inside of the tire to make sure whatever punctured the tube in the first place isn’t still there.
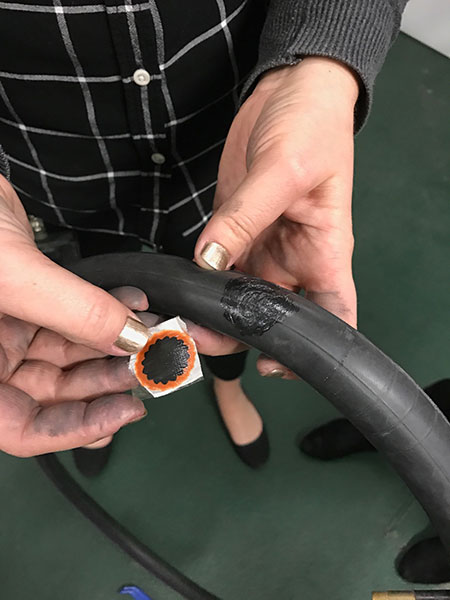
Patience is a virtue!
Once you find the leak, follow the instructions included in your patch kit: 1) roughen up the spot with sandpaper, 2) apply some glue or vulcanizing fluid, 3) be patient for 5 minutes or until the glue is almost dry to the touch, and 4) peel the foil layer off the patch and apply the patch thoroughly.
Carefully get the tube and tire back in place.
If you pinch the tube while forcing the tire back on, you might be back to square one. You can usually get the tire back on gently without using tire levers.
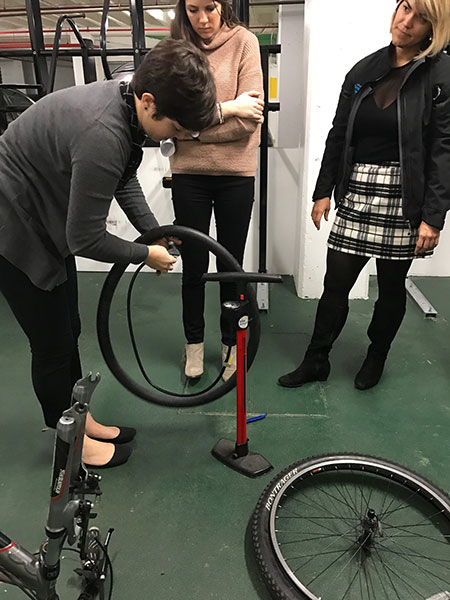
Pump it up.
Pump your tire carefully, checking as you go for any lumps or abnormalities. Inflate it to the PSI recommended on the side of your tire, which helps prevent future flats.
But if you’re more of a visual learner – here’s the same information in graphic form with a cute illustrated pup.
Pro Tips
There was a lot of great conversation happening during the workshop and some of the best tips I picked up were:
- Carry a spare tube at all times, that way you don’t have to patch a flat on the spot
- Find a tutorial video on YouTube, but make sure the bike they’re using is similar to yours
- Frustrated? Rainy day and you just can’t even? Throw your bike on bus or walk to the nearest bike shop
- If you’re changing your back tire, set your bike to the hardest gear so it’s easier to take off the wheel and chains.
- You can prevent flats by making sure your tubes are properly inflated.
- Unless you can find a fixit station nearby, it’s best to carry a small hand pump to inflate your tire again. If your pump doesn’t have a PSI gauge, compare pressure from the other tire and pump up the newly patched tire to match
- If there is a gash in your tire (not tube), you can use a dollar bill on the inside of the tire to get you home safely.
WATCH A QUICK TUTORIAL
For a quick step by step guide from BikeArlington on how to fix a flat, watch this video.

Thanks for sharing these brilliant article. I am always looking for ways to improve my knowledge about bike maintenance. Keep sharing!
Comment
To prevent spam, comments will be approved before appearing on the post. If you have a comment or question, but do not want it to be published, please email BikeArlington.